Unlock the Power of Gmail: Top Tips and Tricks to Boost Productivity and Organization
Updated: May 7, 2026
Gmail tips and tricks get talked about a lot online. Most of what you find is the same six features recycled across a hundred listicles. We are going to skip all of that and share the eight features we actually walk teams through when we set up Google Workspace for a new client, because after helping hundreds of Bay Area companies get up and running, we have a pretty clear sense of which ones actually change how people work.
We see this up close every time we onboard a new team. There is always someone with 11,000 unread emails who has accepted that as a fact of life. A founder sorting receipts into a folder by hand every Friday. An engineer with a single label called "Important" containing 4,000 emails, which, mathematically, makes none of them important. Gmail has over 1.8 billion active users worldwide. Almost none of them are using it anywhere near its potential.
The tools to fix all of this are already sitting inside their inbox. They just need to be turned on.
Here are our top tips and tricks for getting more done with Gmail:
1. Organize Your Emails With Gmail Labels
Labels are the single biggest lever for inbox organization in Gmail, and they are almost always the first thing we set up with a new team. The concept is simple: Labels are color-coded tags you apply to emails. Unlike folders, an email can carry multiple labels at once. A message from a client about a contract renewal can be tagged "Client," "Legal," and "Q3" at the same time, and you can reach it from any of those views without moving it anywhere.
Once you pair Labels with Filters (we cover those next), they apply themselves automatically. Incoming newsletters go straight to "Reading." Emails from your accountant's domain land in "Finance." Anything where you are the only recipient gets flagged as priority. You set it up once and forget about it.
You can also nest labels inside each other, which is useful for anything with sub-categories. A "Sales" label with nested labels for "Leads," "Proposals," and "Closed" keeps six months of pipeline emails organized without any ongoing maintenance.
One important thing for anyone coming from Microsoft Outlook: Labels are not folders. If you delete an email that has three labels on it, it is gone from all three. This catches people out constantly in the first week. Deleting is deleting, not removing a tag.

A word of caution: Many users, especially those used to Microsoft Outlook, think of Labels as folders. However, they are quite different. Keep in mind that Labels do not create copies of your emails. So, if you delete an email under one label, it will be deleted from every label it is attached to.
Google walks through the setup in detail here: Create labels to organize Gmail.
2. Automate Sorting With Gmail Filters
If Labels are the filing system, Filters are the person who does the filing. A Filter is a rule: when an incoming email matches certain conditions, Gmail does something with it automatically. Apply a label, skip the inbox, mark it read, forward it, or star it. Whatever you need.
The setup takes about two minutes per filter and the time savings are immediate. The three filters we recommend to almost every team: one that routes newsletters and marketing emails to a "Reading" label and skips the inbox entirely; one that auto-labels emails from key external domains (your CRM, your accounting software, your legal team); and one that stars anything where you are the sole recipient, which is a reliable signal that someone actually needs something from you personally.
To create a Filter, go to Gmail Settings and open the Filters and Blocked Addresses tab. You can also build a filter directly from a search result, which is often faster. Run any search in Gmail, open the Show search options dropdown, and click Create filter. Gmail uses exactly those search conditions as the filter criteria.


You can find the steps for creating Filters here: Create rules to filter your emails
3. Use "Mark as Unread" to Stay on Top of Your Inbox
This one gets dismissed as too obvious to bother with, and we understand why. But the habit it enables is useful in practice, so bear with us.
You open an email on your phone while waiting for coffee. You read it, you understand what it needs, you are not in a position to deal with it right now. If you leave it as read and close it, you are relying on your memory to bring it back up later. Your memory, in the middle of a workday, is not a reliable system.
Mark it unread before you close it. Now it sits in your inbox looking like new mail, visually flagging itself as unfinished business. You are not adding it to a to-do list or a separate app. You are using the inbox itself as the reminder.
On your desktop, right-click any email in the inbox and select Mark as unread, or open the email and use the More menu (the three dots at the top) to find the same option. On mobile, press and hold the email in the list.

You can find the steps for marking emails as read or unread here: Mark messages as read or unread.
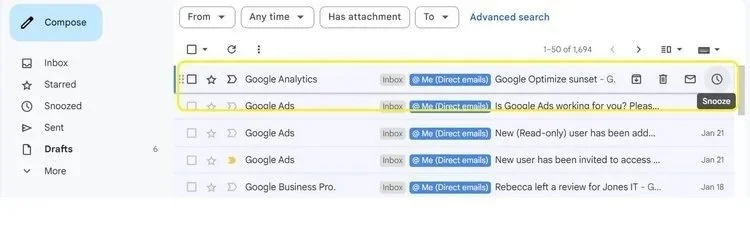
4. Stay Focused With The “Snooze” Feature
Snooze is a close cousin to Mark as Unread, but with a time dimension. Instead of just flagging an email as unread, you remove it from your inbox entirely and tell Gmail to bring it back at a specific time.
The use cases that make this worth building a habit around: a vendor proposal that you want to revisit next Tuesday, not today; a travel confirmation that has no relevance until the morning of the flight; a follow-up you need to send in three days if you do not hear back. Snooze all of those. Your inbox shrinks to what actually needs attention right now, and the snoozed emails reappear exactly when they become relevant.
It is a small shift in how you process email, but it removes a surprising amount of low-grade mental noise.
To snooze an email, hover over it in the inbox and click the clock icon that appears on the right side, or open the email and click Snooze from the top toolbar. Gmail offers a few preset times or lets you set a custom date and time. Snoozed emails sit in a Snoozed folder if you ever need to find them early.
5. Work Faster With Gmail Keyboard Shortcuts
Keyboard shortcuts are the Gmail tip that gets the most skepticism upfront and the most converts afterward. People hear "keyboard shortcuts" and assume it is for power users who have memorized 40 key combinations. That is not really how it works in practice. You learn five or six that cover 90% of what you do in your inbox, and everything else just gets faster.
A few of the most useful ones to start with:
C: compose a new email
E: archive the selected email
R: reply to the open email
F: forward the open email
G then I: jump to your inbox from anywhere
/: jump straight to the search bar
Shift + U: mark as unread
?: open the full shortcut reference right inside Gmail
Shortcuts are off by default, which is why most people never discover them. To turn them on, go to Settings, find Keyboard shortcuts in the General tab, and select Keyboard shortcuts on. Google keeps a full keyboard shortcut reference for Gmail for when you are ready to go deeper.

6. Avoid Sending Mistakes With Undo Send
You have sent an email you immediately regretted. Everyone has. Maybe the attachment was missing. Maybe you hit reply all when you meant to reply. Maybe you reread the first line and cringed. Undo Send is the buffer that stands between you and that sinking feeling.
The feature works exactly as described: after you click Send, there is a window during which you can cancel the email before it actually goes out. Gmail's default window is five seconds. We recommend going into Settings and bumping it to 30 seconds. Five seconds is barely enough time to spot a problem. Thirty seconds gives you a moment to actually reread the thing.
To adjust it, go to Settings, find Undo Send in the General tab, and set the send cancellation period to your preferred duration. Save changes and it takes effect immediately.
This is one of those settings that takes 20 seconds to change and will pay for itself the first time you send an email to the wrong person.

7. Set Up Gmail's Vacation Responder Before You Head Out
Vacation Responder sends an automatic reply to anyone who emails you during a date range you set. You configure it once, and Gmail handles the acknowledgments while you are out. People know you received their email, they have a sense of when to expect a response, and the follow-up pings stop.
A couple of things about how it actually works that are worth knowing. Gmail only sends the auto-reply once per sender every four days, so the same person emailing you repeatedly will not get a stack of automated responses. You can also restrict it to only reply to people in your contacts or your company domain, which is useful if you would rather not broadcast your out-of-office details to every external sender.
The message itself is worth a little care. Vague out-of-office replies create as many follow-ups as they prevent. If someone is covering for you, name them. If there is a category of issue that cannot wait, give people a path to escalate. A few extra sentences here saves a lot of back-and-forth when you return.
To set it up, go to Settings, scroll to Vacation responder in the General tab, turn it on, enter your dates, write your message, and save.

8. Send at the Right Time With Schedule Send
Schedule Send does one thing: it lets you write an email now and have Gmail deliver it at whatever time you choose. This is more useful than it first sounds.
The obvious case is finishing work at 11pm and not wanting your email to arrive with a timestamp that implies you expect a response at that hour. Schedule it for 8am and it lands like a normal morning email. But the less obvious cases are where it really earns its keep. Sending a follow-up exactly three days after an initial message. Getting a weekly team update into everyone's inbox Monday morning instead of Friday afternoon when people are already checked out. Reaching a contact in Tokyo during their business hours without doing timezone math at the moment of composition.
To use it, compose your email normally, then click the dropdown arrow next to the Send button and select Schedule send. Choose a suggested time or set a custom date and time. Scheduled emails live in the Scheduled folder until they go out, and you can cancel or reschedule them any time before delivery.

Getting More From Gmail in Google Workspace
All eight of these Gmail tips and tricks work with a standard Gmail account. But inside a managed Google Workspace environment, they get considerably more useful. Admin-level settings let you enforce consistent labeling across a team, set up delegation so assistants can manage executive inboxes, and integrate Gmail tightly with Calendar, Drive, and Meet in ways that are harder to do on your own.
We see the gap most clearly when we compare two teams at a similar stage. One has had some thoughtful setup: everyone uses Labels and Filters, Snooze is part of how people process email, and the inbox is a tool rather than a source of background stress. The other has the exact same tools available and has collectively decided, without quite realizing it, that inbox chaos is just how email works. It is a setup and habits problem. Both are fixable.
If you are looking to get your team running Google Workspace the right way, or thinking about migrating from Microsoft 365 and want to avoid the common headaches, reach out to us. We have done this for a lot of Bay Area companies and we are happy to talk through what makes sense for your situation.


About The Author

Hari SubediMarketing Manager at Jones IT
Hari is an online marketing professional with a focus on content marketing. He writes on topics related to IT, Security, and Small Business. He is also the founder and managing director of Girivar Kft., a business services company located in Budapest, Hungary.