Conference Room AV Setup: What IT Needs to Know Before You Buy Anything
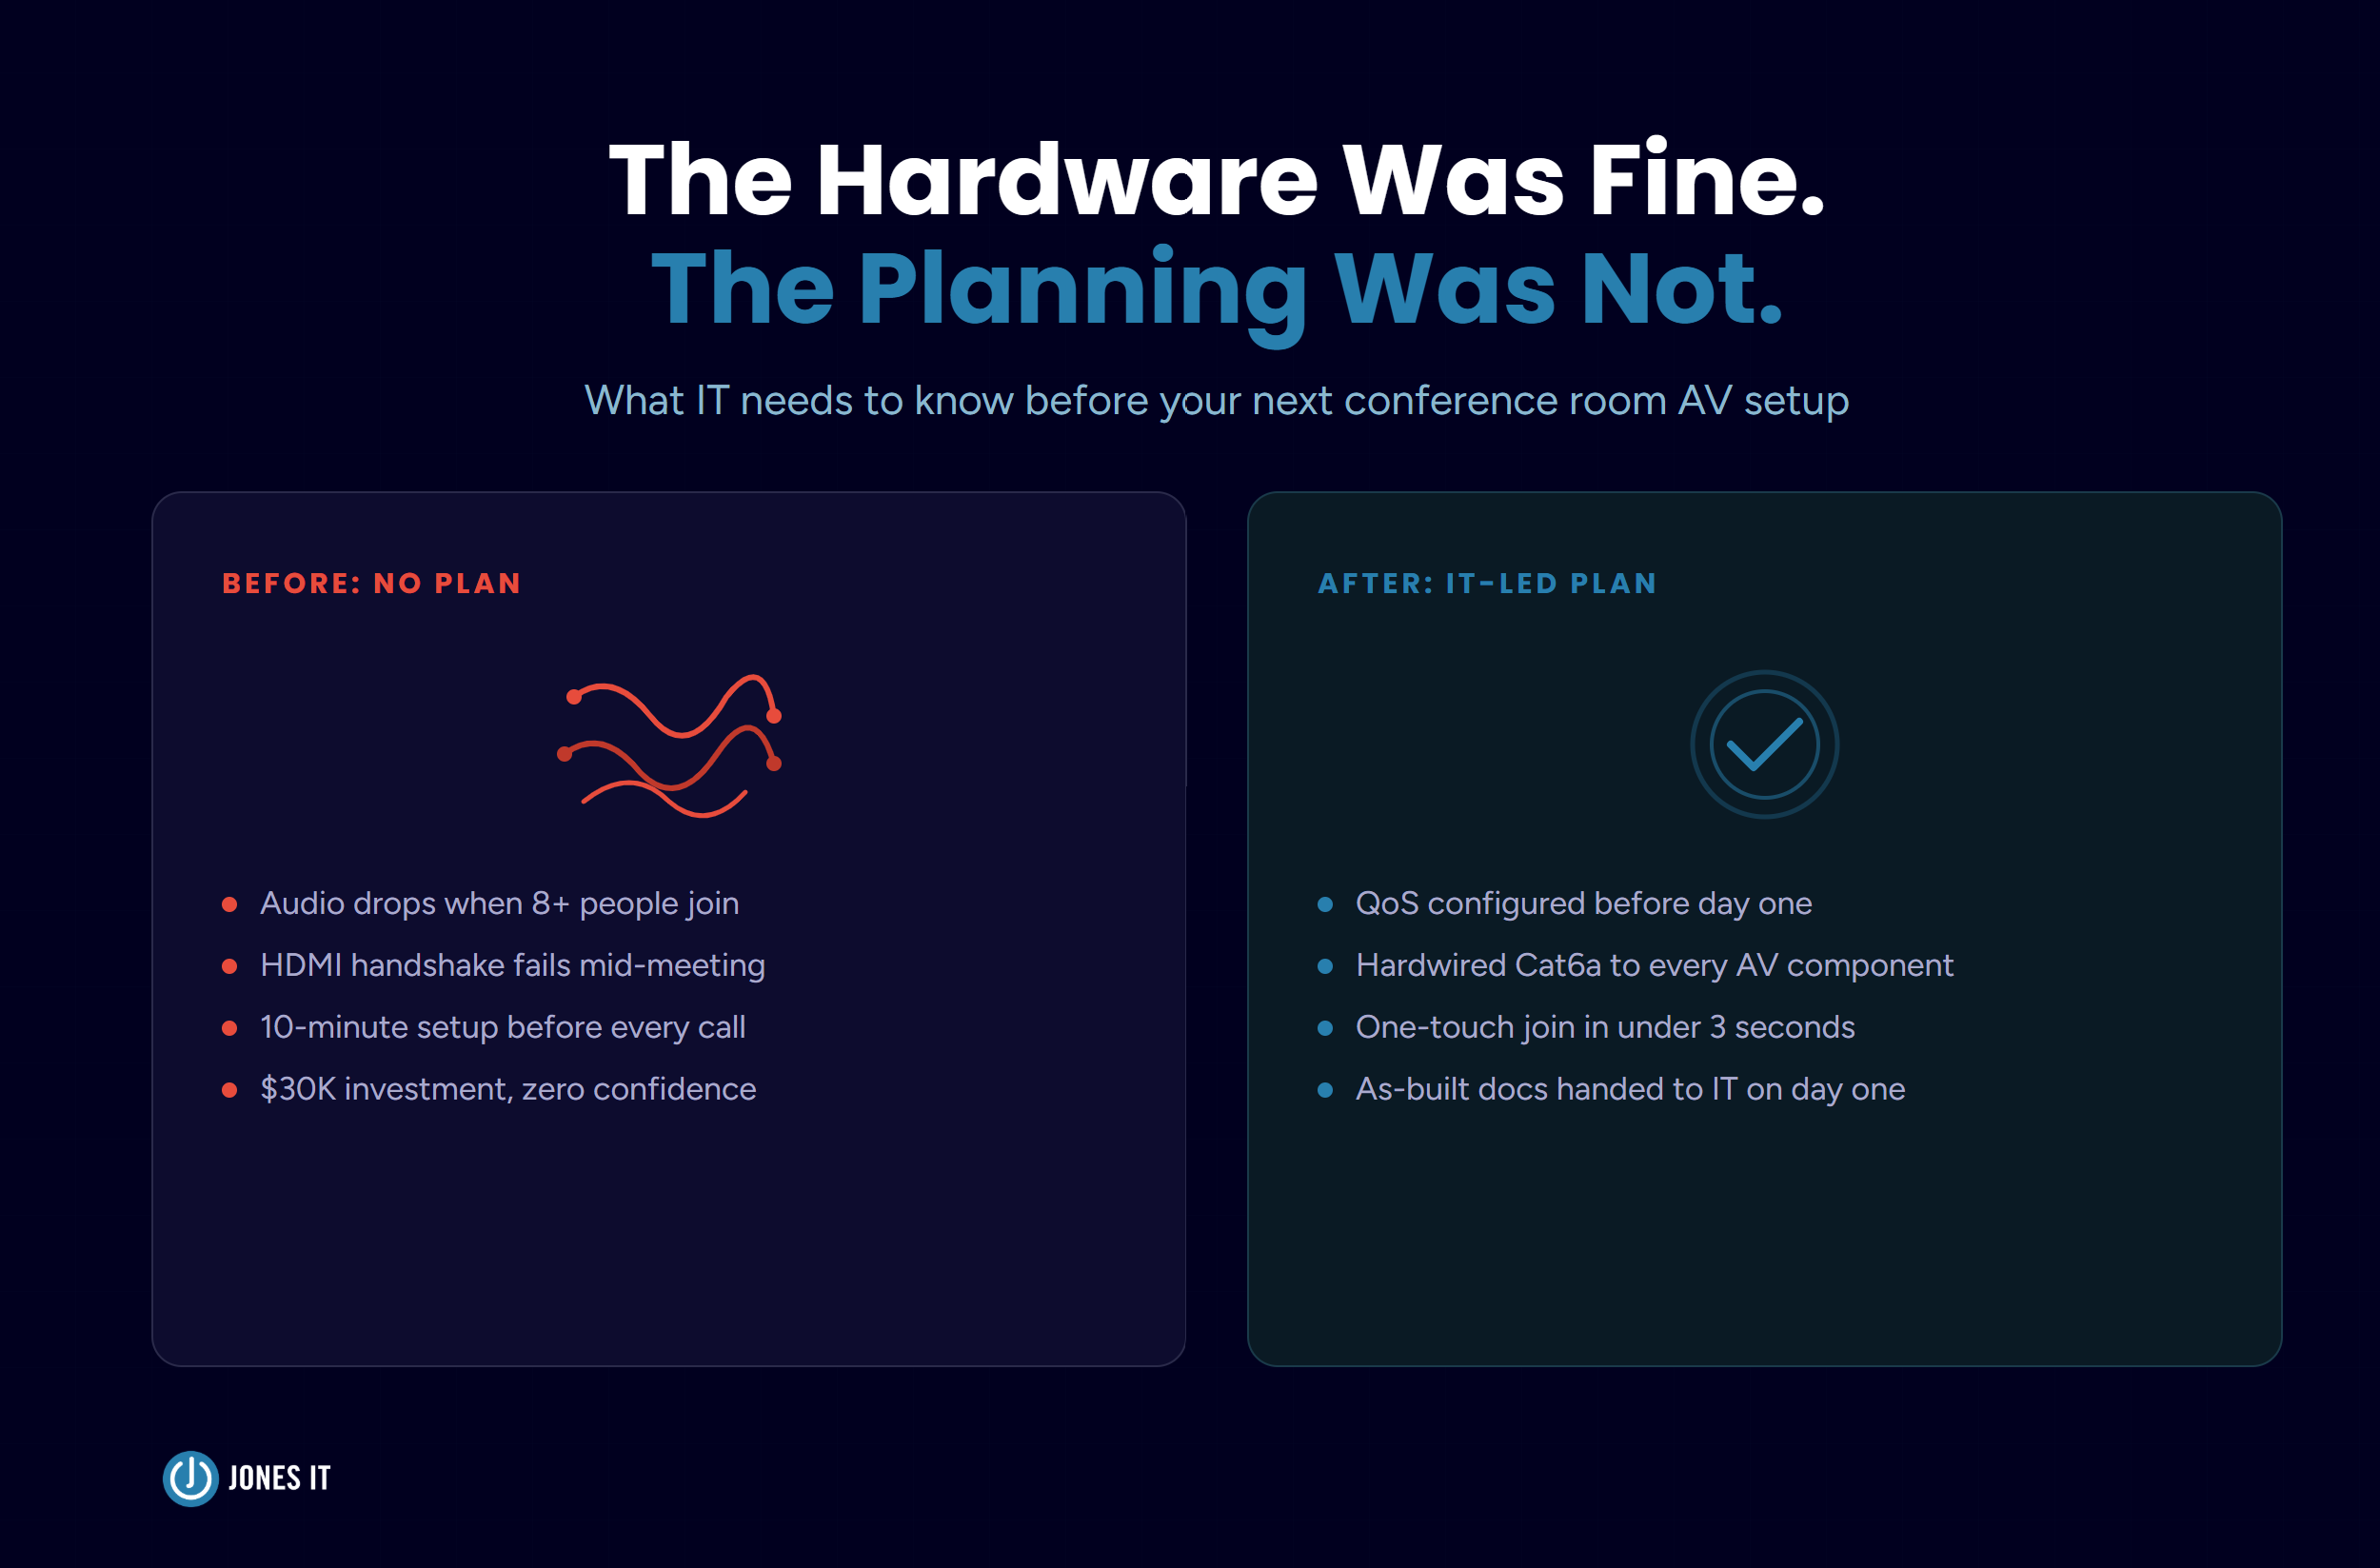
An office manager called us a few months ago, frustrated. Their company had just spent close to $30,000 outfitting their new boardroom with a name-brand display, a premium video bar, and a wireless presentation system. The room looked great. But every time more than eight people joined a call, the audio turned to mush. Remote participants could not hear the far end of the table, the HDMI handshake kept dropping mid-presentation, and nobody could figure out how to start a meeting without a 10-minute troubleshooting session.
The hardware was fine. The planning was not.
A conference room AV setup involves more than picking a display and a camera and calling it done. Whether you are outfitting a huddle space, a hybrid meeting room, or a full boardroom, the decisions you make before you even unbox a single device determine whether that room becomes a productivity asset or the most complained-about space in the office. We have been through this process dozens of times with Bay Area companies, and the lessons are consistent enough that we wanted to put them in writing.
If you are planning a conference room AV setup, whether it is a single huddle room or a full boardroom refresh, here is what you need to think through first.
How to Plan a Conference Room AV Setup: Start With the Room
The most common mistake we see is jumping straight to hardware selection. Someone sends a link to a popular video bar and asks whether it will work. Maybe. But that question is almost impossible to answer without knowing the room.
Room size and intended use drive every downstream decision in any conference room AV setup. A huddle space for two to seven people has different requirements than a boardroom for twenty. The display size that reads clearly for a small group turns into a postage stamp in a large room. A camera that covers a small round table cannot track speakers across a 20-foot conference table without a pan-tilt-zoom mechanism.
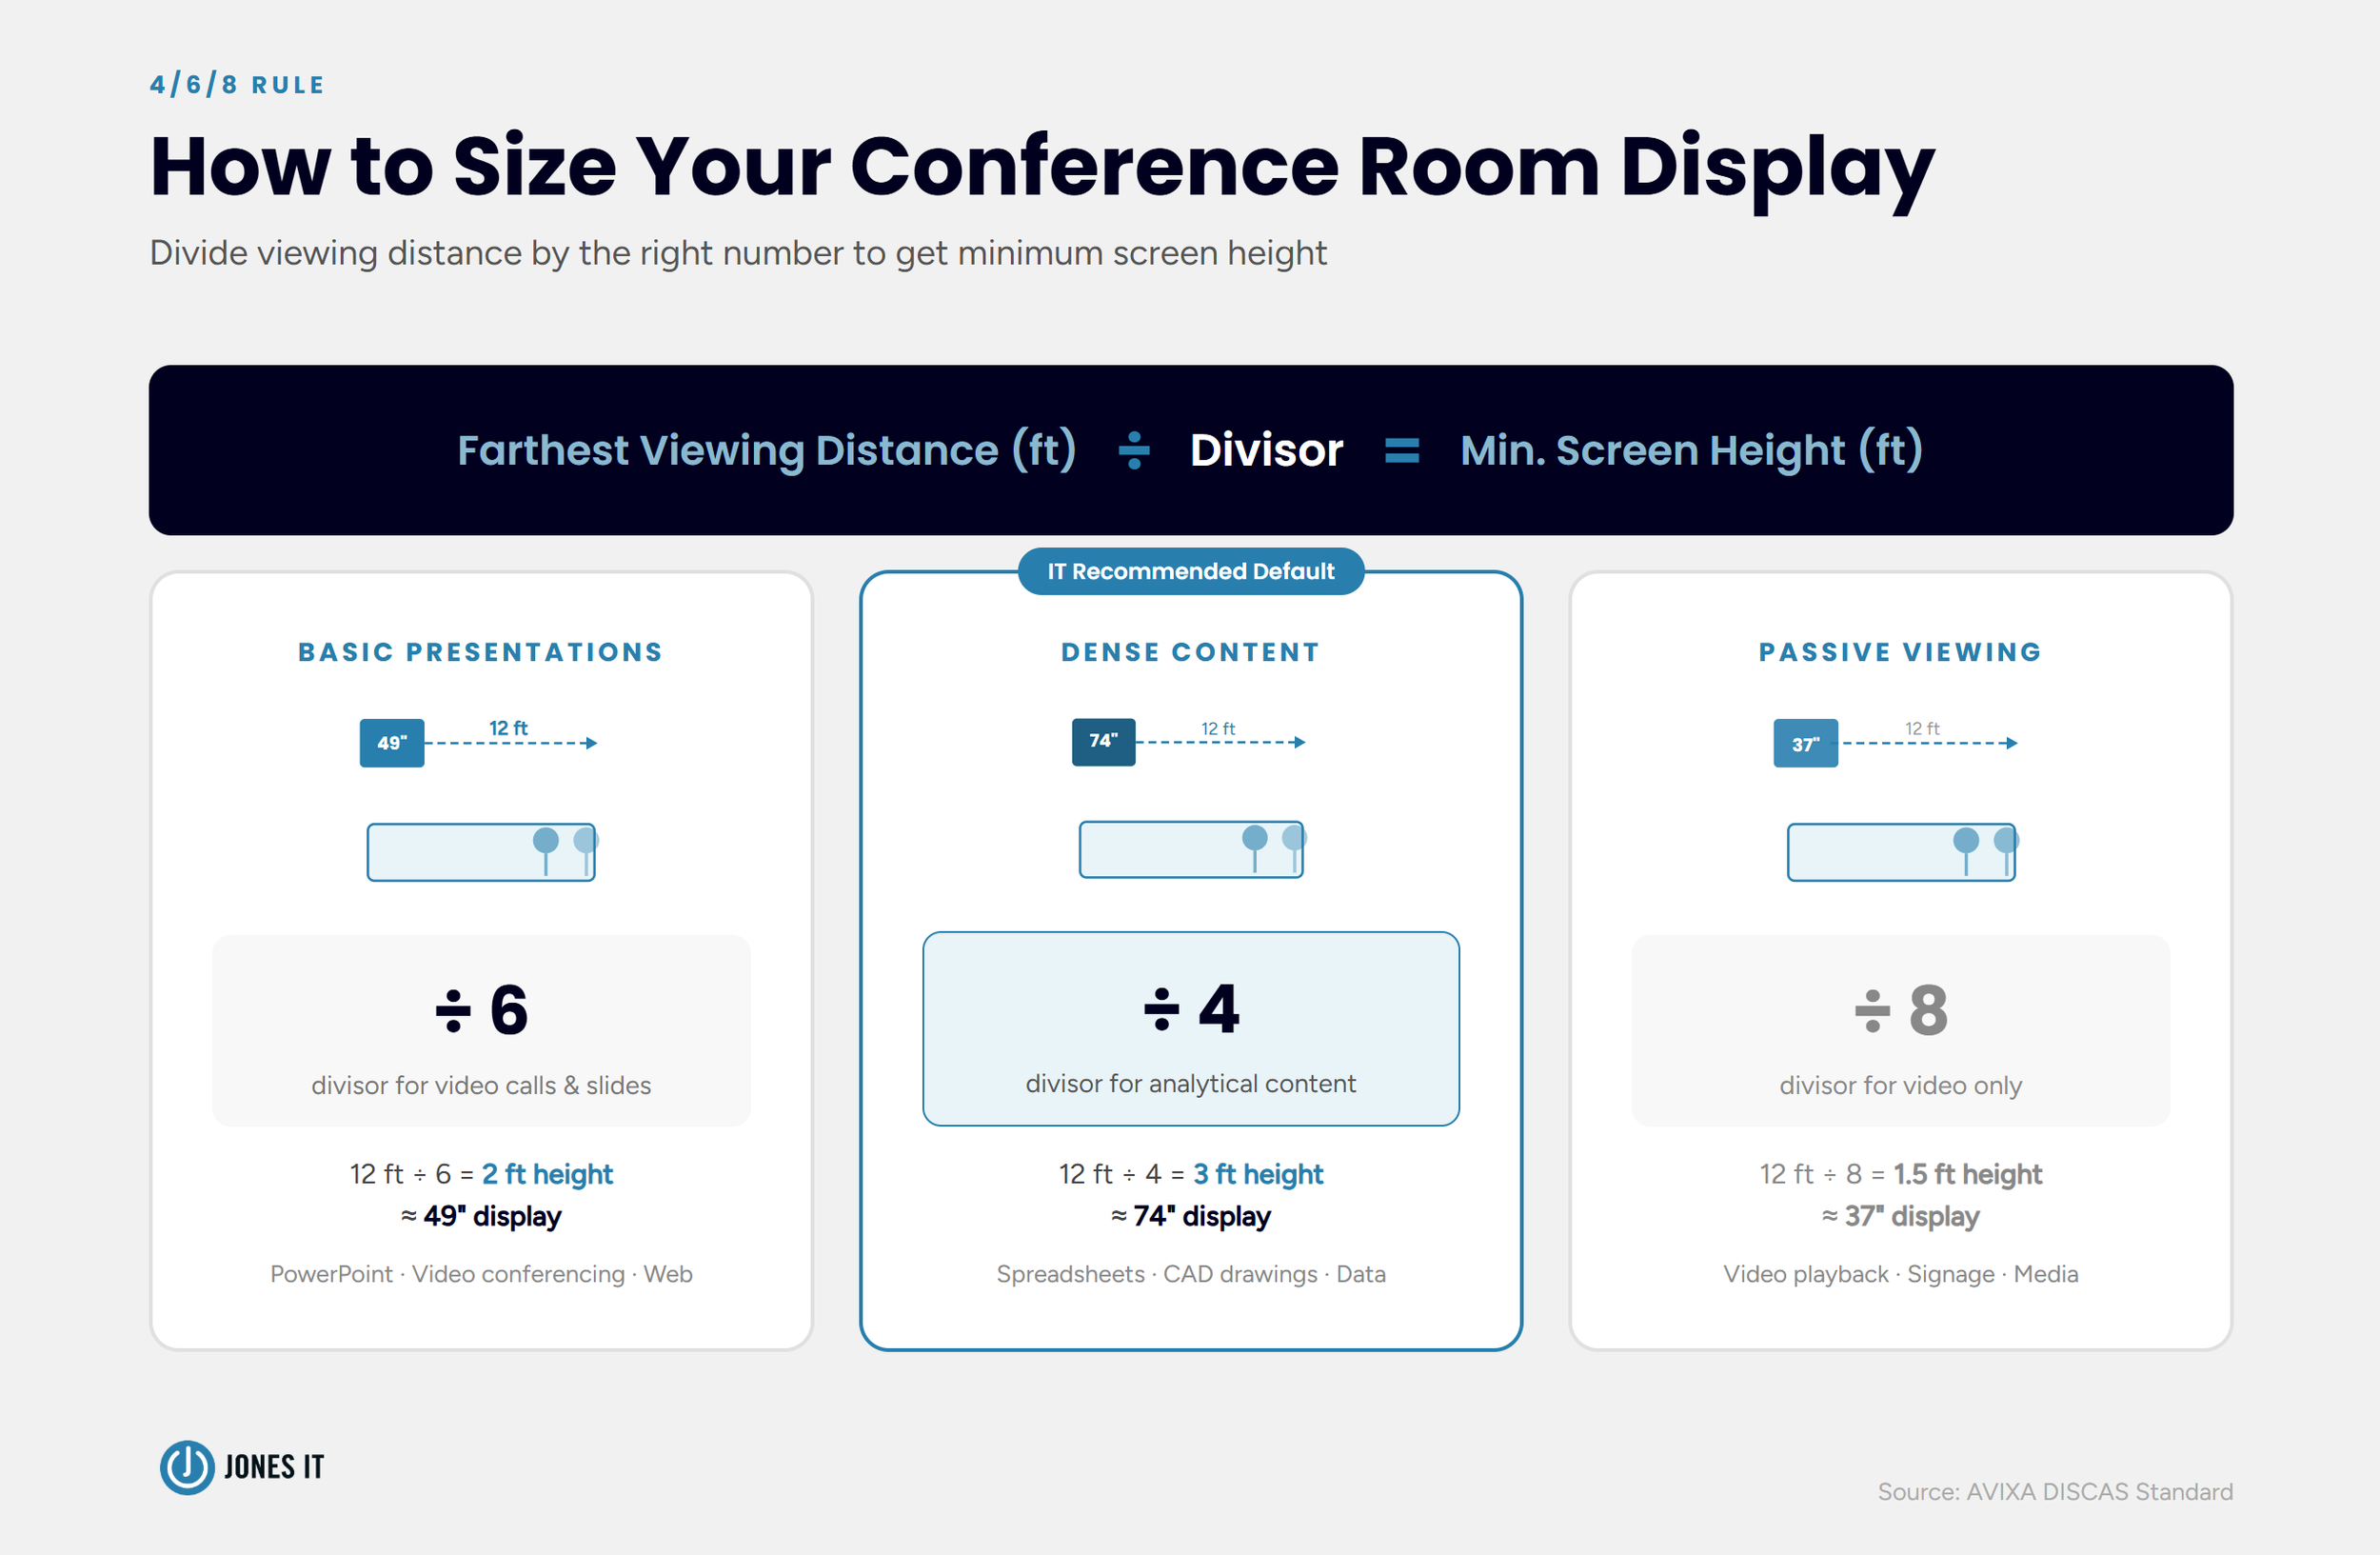
A useful starting point is the AVIXA 4/6/8 rule, which is the industry standard for conference room display sizing. Divide the distance to the farthest viewer (in feet) by 6 to get the minimum image height in feet for standard presentations and video conferencing. For a room where the farthest seat is 12 feet from the screen, that gives you a 2-foot (24-inch) minimum image height, which corresponds to roughly a 49-inch display. For rooms where people are reviewing dense content like spreadsheets or CAD drawings, use a divisor of 4 instead of 6. That same 12-foot room now needs a 3-foot (36-inch) image height, requiring a 74-inch display. Select the next higher size if the calculation gives you an atypical screen size.
It is also worth thinking about the mix of in-room versus remote participants. A room that hosts mostly internal meetings has different camera and audio requirements than one where half the participants are dialing in from home. The remote experience is easy to treat as secondary, but that is exactly what creates the situations where remote participants feel like they are watching through a periscope.
For more on the broader conference room setup decisions, we wrote a full guide: The Essential Conference Room Setup Guide.

Network and Infrastructure Requirements for Conference Room AV
We are an MSP, so naturally, we pay close attention to the network side of AV builds. And it is consistently where the most avoidable problems originate.
Bandwidth
High-definition video requires a reliable minimum upload speed of 5 Mbps per room, a threshold documented in Cisco's collaboration infrastructure guidelines. If you want stable 4K performance with multiple simultaneous streams, budget for at least 8 Mbps. That might sound like a low bar, but the keyword is per room. An office running four or five active video calls simultaneously can saturate a shared connection quickly, especially if that same connection is handling regular business traffic.
Before any conference room AV setup goes live, run a bandwidth test from the room during normal business hours. Peak-time performance is what matters, not what your ISP advertises.
Quality of Service
Even with adequate bandwidth, video and audio packets can get bumped by other traffic during high-load periods. Network switches should be configured with Quality of Service settings that prioritize real-time video and audio over standard data. Without QoS, a file transfer or software update can cause noticeable stuttering mid-meeting. This is a switch-level configuration, and it is worth confirming before your AV system goes live.
Wired Over Wireless
For AV infrastructure, Cat6 or Cat6a hardwired connections are the right call. Wi-Fi introduces variability that hardwired connections avoid entirely. We relegate wireless to mobile devices and guests. AV components, compute devices, and video bars should all be on wired Ethernet.
Electrical and Conduit
AV gear draws clean, consistent power and should be on dedicated 15 to 20-amp circuits rather than sharing general office loads. Electrical interference from office equipment can introduce noise into AV systems that is genuinely difficult to diagnose after the fact.
Plan conduit capacity generously. A good rule of thumb is to run pathways with 50 percent extra capacity beyond what you need today. Retrofitting conduit after walls are finished is expensive and disruptive. That buffer lets you add fiber or additional copper runs as technology evolves without structural rework.
Conference Room AV Equipment: Displays, Cameras, and Audio
Once the room profile and infrastructure are defined, hardware selection becomes much more straightforward. Here is how we think through the major components of a conference room AV setup.
Displays
For most conference rooms in the 55 to 98-inch range, LED flat panels in a controlled office environment are the right choice. Laser projectors make sense when you need a 200-inch-plus display for an auditorium or training room. LED video walls are worth considering for boardrooms with high ambient light or specific visual impact requirements.
One configuration detail that frequently gets missed: displays must be set to Game or PC mode. This bypasses internal image processing and cuts latency to a minimum. In default mode, some consumer and commercial displays introduce enough processing delay that there is a visible gap between a speaker's lips moving and the audio reaching remote participants. It sounds subtle until you are on a call for an hour.
Mount height matters too. For seated participants, center the display at 42 to 48 inches from the floor. Higher is not better. A display mounted too high forces people to crane their necks, and it pulls their gaze away from camera level.
Cameras
For small huddle rooms, a wide-angle fixed camera works well. For medium to large rooms, a PTZ camera gives you the ability to frame specific speakers or the full group. AI auto-framing cameras adjust the field of view based on room occupancy, which reduces the need for someone to manually manage the camera during a meeting.
Camera mounting height should be 45 to 47 inches above the floor, which puts the lens at seated eye level. Mounting above 71 inches creates a top-down perspective that makes in-room participants look like they are being observed from a security camera. Remote participants lose the sense of being in the same space. For placement, keep the table front at least 0.7 times the table width away from the camera to avoid lens distortion.
For a detailed breakdown of specific video conferencing hardware options, see our post on Which Google Meet Hardware Is Right for Your Conference Room.
Audio
Audio is the component most likely to undermine an otherwise solid conference room AV setup. Remote participants can tolerate a slightly grainy video feed, but unintelligible audio ends the meeting.
For fixed seating configurations, beamforming microphone arrays are the current standard. They use voice tracking to pull speech from specific directions while rejecting ambient noise. For small round tables, an omnidirectional microphone with 360-degree pickup covers the room adequately. For U-shaped table configurations, low-profile boundary microphones work well.
For large boardrooms with long tables, daisy-chained microphone units connected via a single PoE cable can cover 20 to 30 feet without signal degradation. The number of units needed depends on the table length and room acoustics.
Three DSP features that should be non-negotiable: Acoustic Echo Cancellation to prevent feedback loops, Automatic Gain Control to normalize volume between soft and loud speakers, and Noise Suppression to filter out HVAC hum and keyboard noise. Most business-grade audio systems include all three, but confirm before purchasing.
Video Conferencing Hardware and Room Control Options
The compute model determines the day-to-day user experience more than almost any other decision in a hybrid meeting room or dedicated conference room AV setup.
All-in-One Video Bars
Integrated units that combine a camera, microphone, and compute in a single device are well-suited for huddle rooms. They are fast to deploy, relatively easy to manage, and deliver a consistent experience. The tradeoff is limited flexibility if requirements change.
Dedicated Compute Devices
A permanent PC or appliance mounted behind the display and pre-configured for one-touch join is the most stable solution for medium to large rooms. This approach avoids the variability that comes from different users bringing different laptops, different software versions, and different peripheral compatibility issues.
BYOD
A plug-and-play model via USB-C or HDMI gives users flexibility and keeps room setup costs down. It works well in rooms used by diverse teams with different video conferencing platforms. The downside is that the room experience varies based on who brings their laptop, and troubleshooting complexity goes up accordingly.
Room Scheduling and Control
Touch panels at the center of the room for signal routing, volume, and one-touch meeting join have become standard in well-designed rooms. Exterior wall-mounted scheduling displays integrated with Google Workspace or Outlook make room availability visible without requiring anyone to check a calendar. For offices with multiple meeting rooms, this reduces the familiar problem of rooms being squatted or double-booked.
We have tested both Google Meet and Zoom hardware extensively in Bay Area offices. If you are trying to decide between the two platforms before committing to hardware, our comparison post covers the practical differences: Google Meet vs. Zoom: Which One Is Right for Your Business.
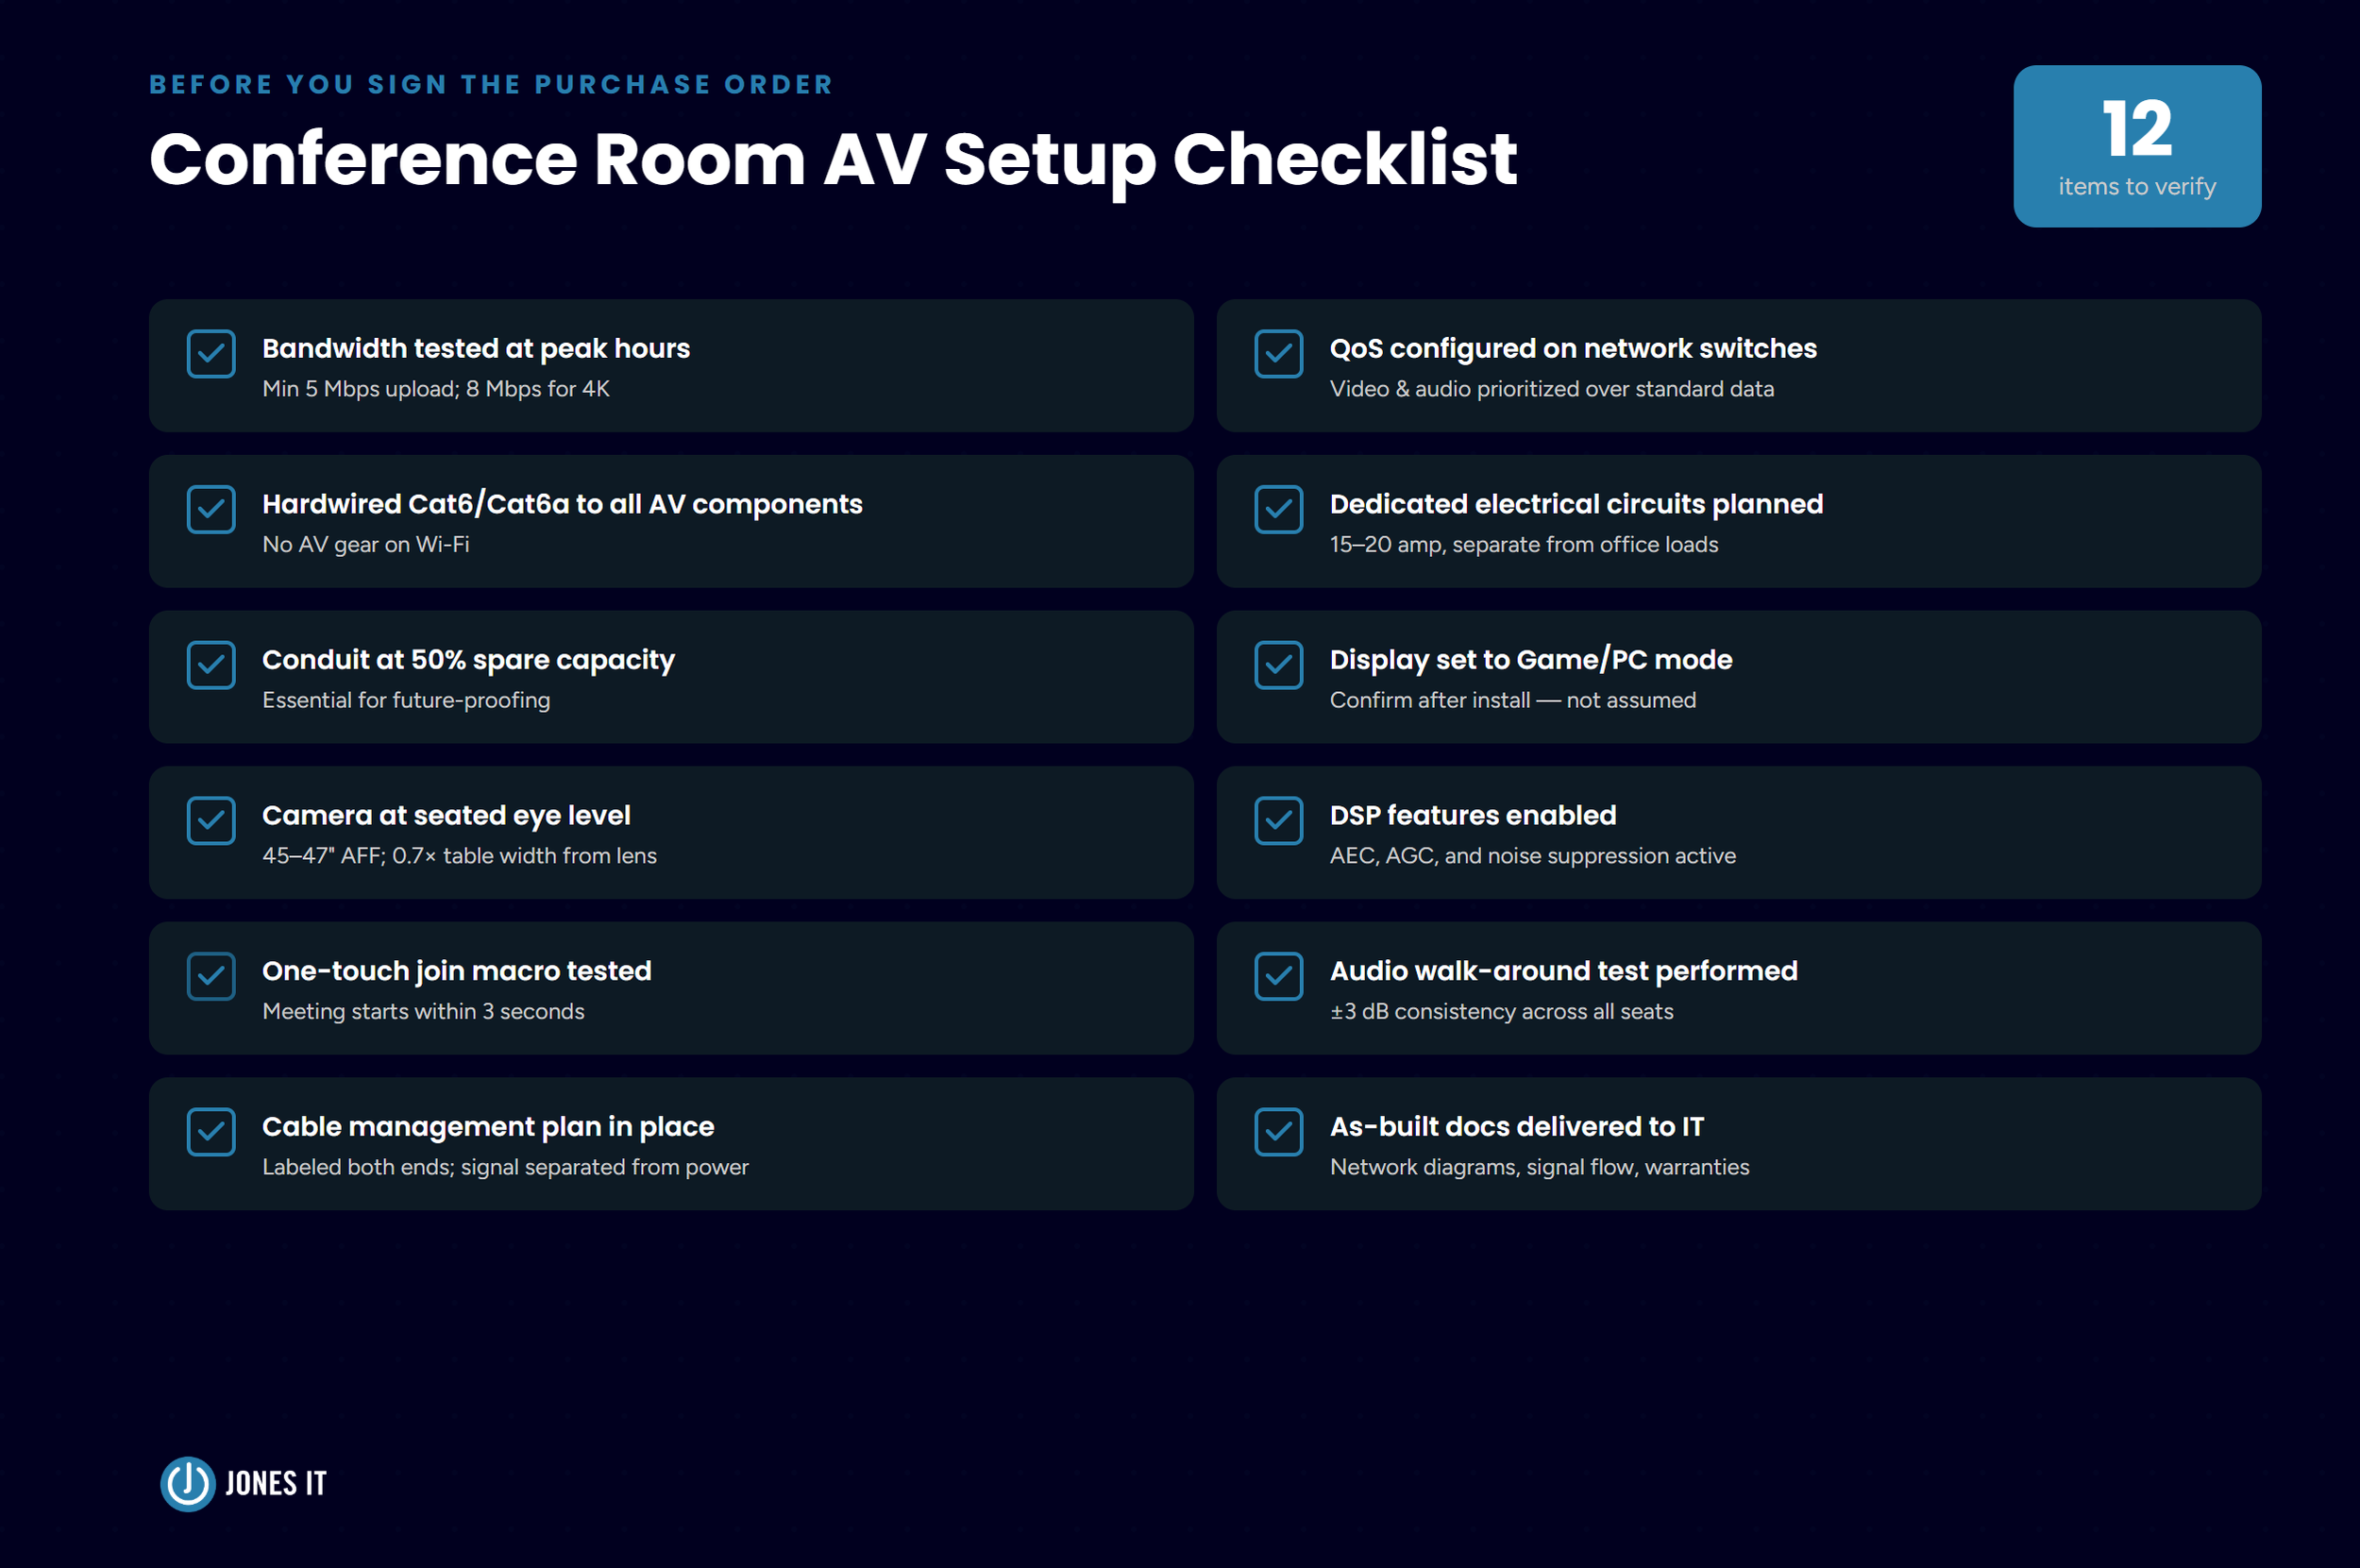
Conference Room AV Setup Checklist: Before You Sign the Purchase Order
This conference room AV setup checklist covers the infrastructure, hardware, and configuration questions worth resolving before anything ships. Whether you are managing this build yourself or working with an AV vendor, get answers to all of these first.
Bandwidth tested from the room at peak hours? Confirm minimum 5 Mbps upload; 8 Mbps for 4K or multi-stream.
QoS configured on network switches? Video and audio traffic must be prioritized over standard data.
Hardwired Cat6/Cat6a to all AV components? No AV gear on Wi-Fi.
Dedicated electrical circuits planned? 15 to 20 amp circuits, separate from general office loads.
Conduit at 50% spare capacity? Essential for future-proofing without structural rework.
Display set to Game/PC mode? Confirm after installation, not assumed.
Camera at seated eye level? 45 to 47 inches AFF; table front at least 0.7x table width from lens.
DSP features enabled? AEC, AGC, and noise suppression confirmed active.
One-touch join macro tested? Meeting starts should complete within 3-5 seconds of initiating.
Audio walk-around test performed? Check for consistent microphone pickup within +/- 3 dB across all seats.
Cable management plan in place? Labeled at both ends; low-voltage signal cables separated from power lines.
As-built documentation delivered to IT? Network diagrams, signal flow charts, and equipment warranties.
Conference Room Acoustics and Lighting: What IT Should Know
We will be brief here because acoustic treatment and interior design are not our area of expertise, but they do affect the technology directly.
Glass walls, stone floors, and hard surfaces create reverberation that even the best DSP cannot fully compensate for. If a room has significant reflective surfaces, budget for some acoustic treatment before installing audio equipment. The microphone and speaker performance you test in the store will not match what you get in a live, echo-prone room.
Wall color in the camera field of view matters for video quality. Neutral grays and beiges reproduce skin tones accurately. Primary colors (red, blue, green) cause color distortion on video feeds. Lighting color temperature should fall in the 4500K to 5000K range for natural-looking video.
For a deeper look at how room setup factors into the overall design decision, our post 7 Steps to Make the Best Conference Room for Your Office covers the non-technology side in detail.
Get Your Conference Room AV Setup Right the First Time
The client we mentioned at the start eventually got their boardroom working. The fix was not a hardware replacement. It was QoS configuration on the network switch, a microphone repositioning, and turning on the display's PC mode. Three changes, under an hour of work.
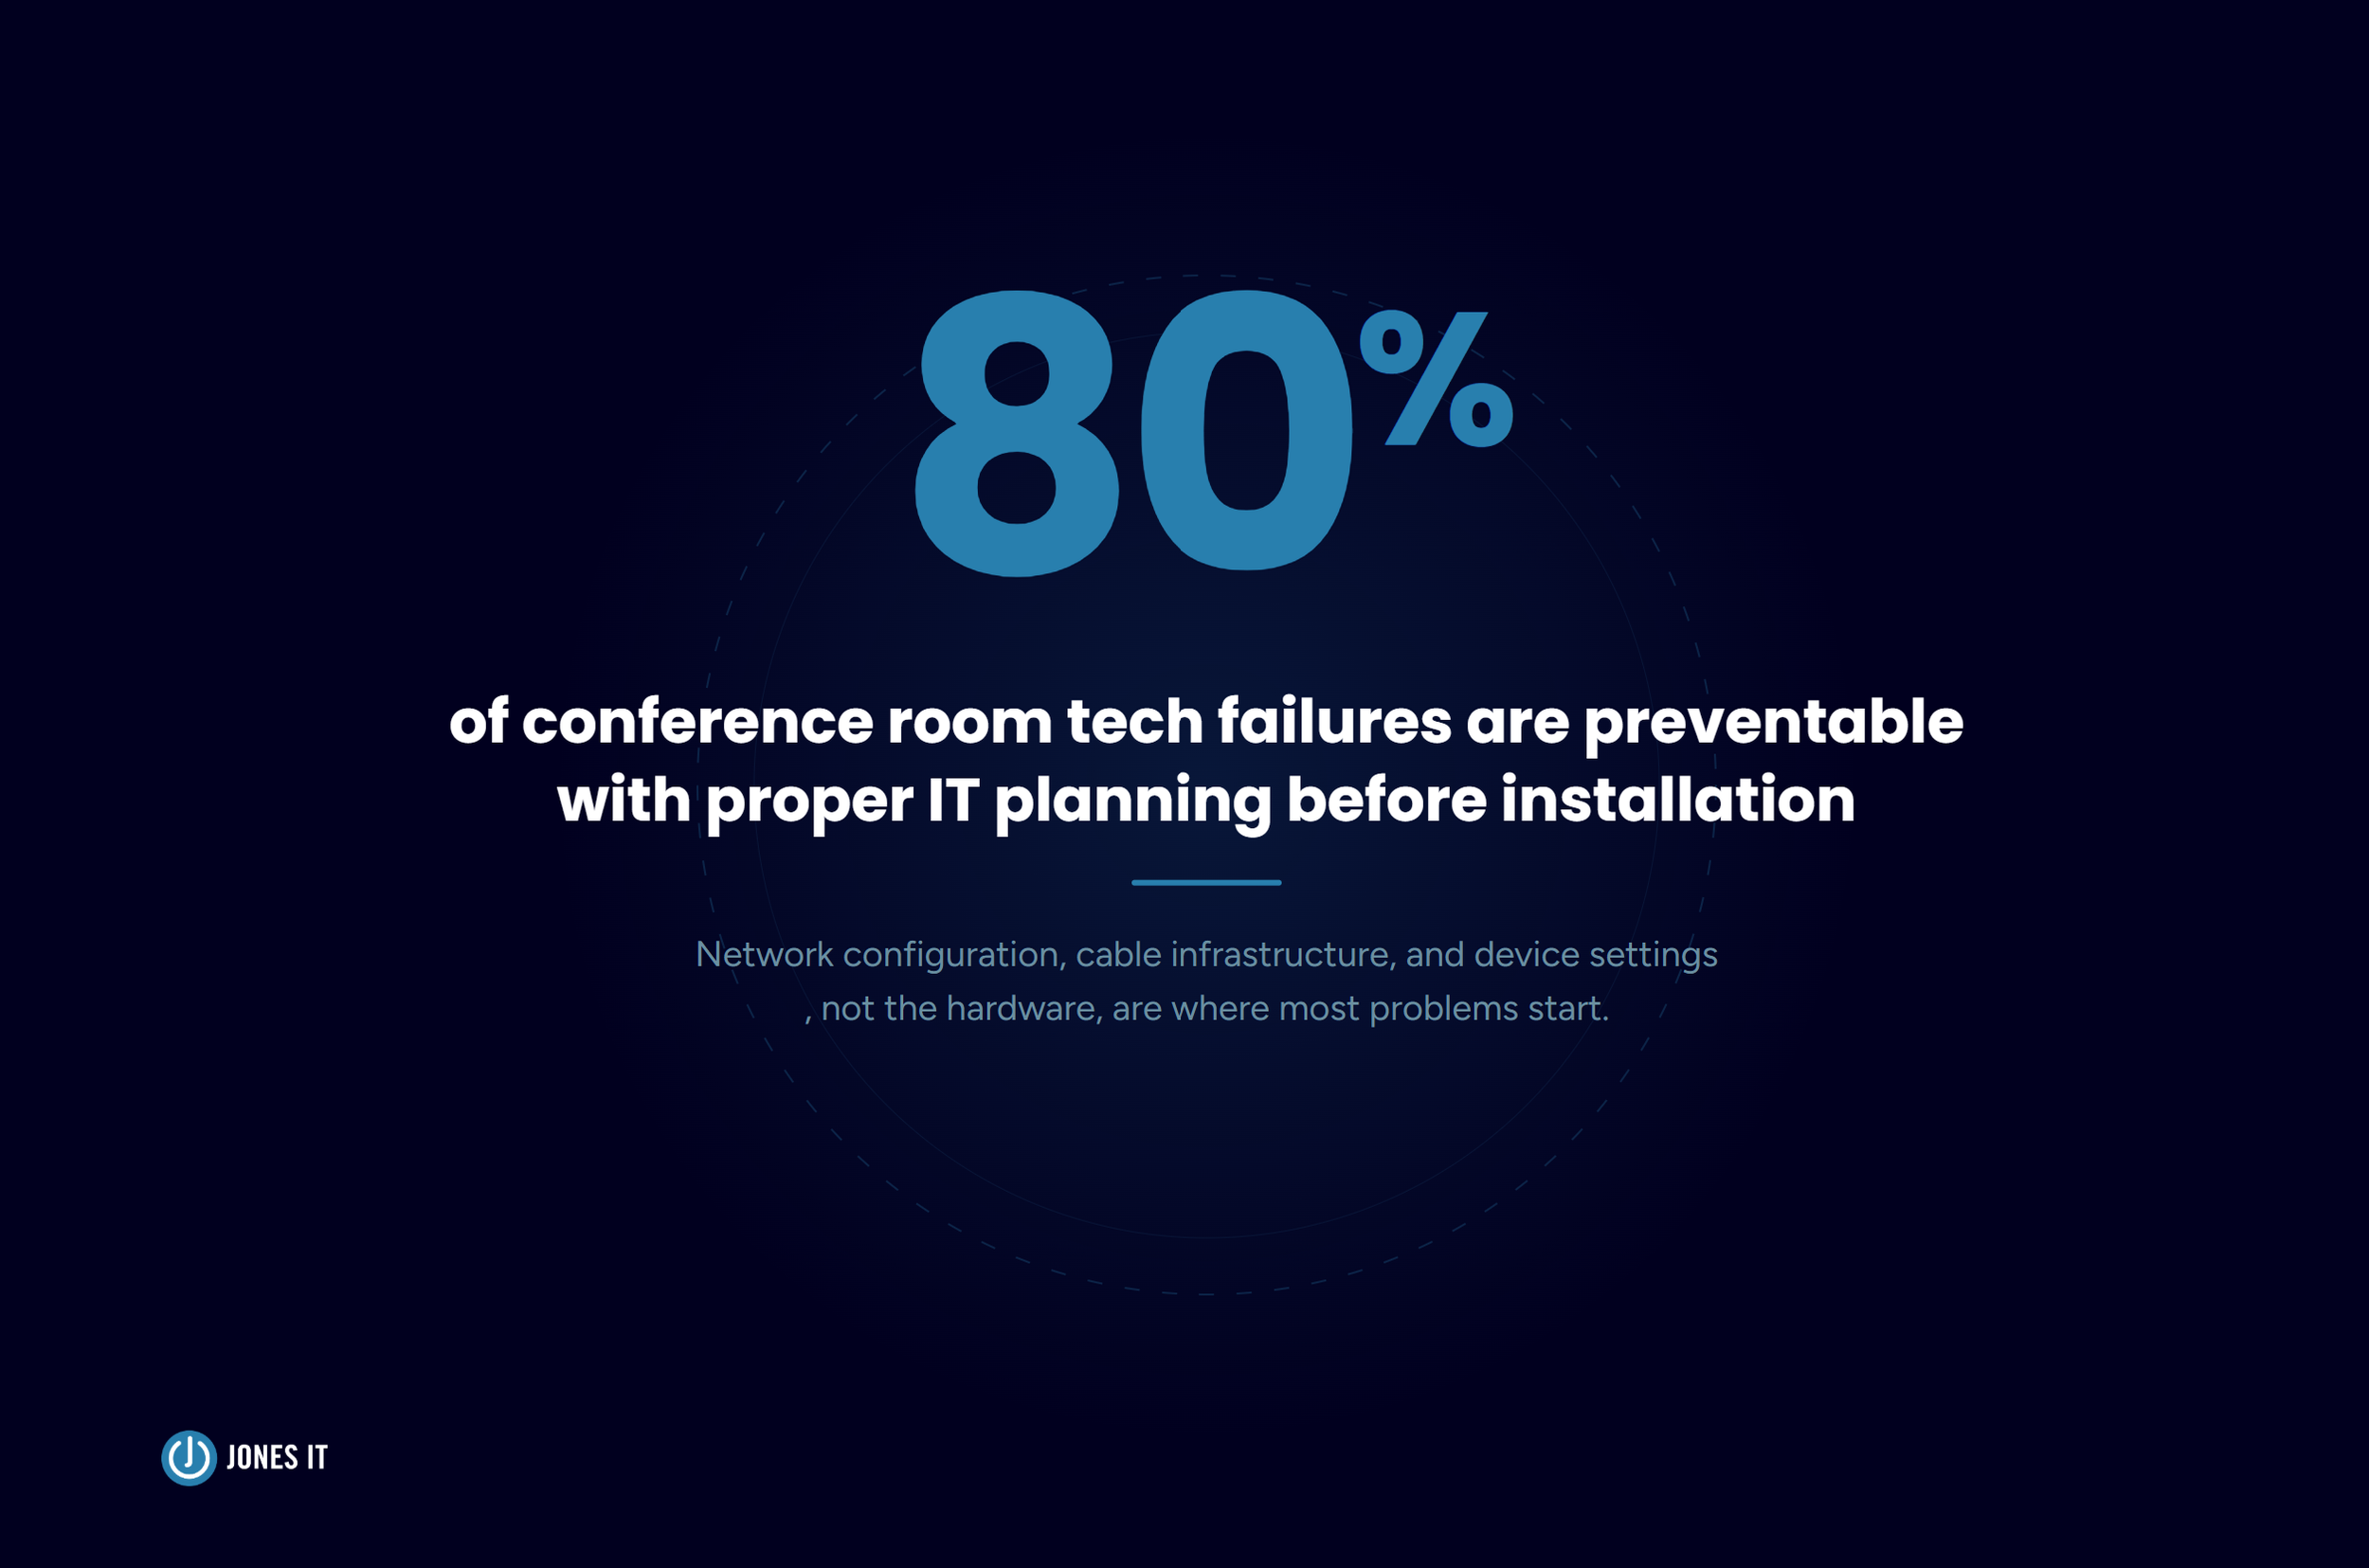
The frustrating part is that all three issues were knowable before installation. A proper needs assessment and infrastructure check would have caught them. The expensive part is not the hardware; it is the do-over.
If you are planning a conference room AV setup and want a second set of eyes on the design, we would be glad to help. Reach out to the Jones IT team, and we can talk through what you are working with.
Contact Jones IT to get professional help with your conference room AV setup.


About The Author

Hari SubediMarketing Manager at Jones IT
Hari is an online marketing professional with a focus on content marketing. He writes on topics related to IT, Security, and Small Business. He is also the founder and managing director of Girivar Kft., a business services company located in Budapest, Hungary.